


Pod 中资源引入方式对比
写这篇博客起因是由于周四在知识小集发了一个 Tip,讲 Pod 里面使用了 .xcassets 会导致 Xcode 9 打出来的包没有 icon 的解决方案。然后和 @Damonwong 展开了一下讨论。当然这条 Tip 讲得不全对,而且表达得不是很清晰,所以这里专门开一篇文章来讲一下那个 Tip 想要表达的意思,最后也会附上对应的 Demo。也当做之后要写的模块化系列的文章开篇吧。
首先我们先来给出结论:
podspec里面写资源时,最好用s.resource_bundle而不是s.resource- 只有
podspec使用resource且明确写了.xcassets的情况下才会导致Xcode 9打出来的包没有icon
环境配置:Xcode 9.2 、Cocoapods 1.4.0 本文所涉及到的资源主要是指
png格式的图片
下面我们先来了解一下这两种方式的具体情况,以及各自的优劣势,最后通过一个 Demo 来验证我们上面给的结论。
resource 和 resource_bundle
resource
通过官方文档描述
>A list of resources that should be copied into the target bundle.
这种方式会引用的文件夹下的所有资源拷贝到 target 的 bundle 中去,可以简单的理解为 .app 目录下或者 .app 的 Assets.car 文件中(如果是 .xcassets 的资源)。
Tips: 注意一下上面加粗的部分。
这里抄一下官网上给的几个示例写法
>#单个路径 >spec.resource = 'Resources/HockeySDK.bundle' >#多个路径 >spec.resources = ['Images/*.png', 'Sounds/*']
resource_bundle
还是一样,我们来看一下 Cocoapods 官方文档上的描述
This attribute allows to define the name and the file of the resource bundles which should be built for the Pod. They are specified as a hash where the keys represent the name of the bundles and the values the file patterns that they should include.
这种方式可以将指定路径下的资源打包打 => 之前的 key 命名的 bundle 中,这个 bundle 最终会被拷贝到 target 也就是 .app 根目录下。如果有指定 .xcassets 资源,会被打包到以 key 命名的 bundle 里的 Assets.car 文件中。
Tips: 注意一下上面加粗的部分。
官方示例写法
>#单个路径 >spec.ios.resourcebundle = { 'MapBox' => 'MapView/Map/Resources/*.png' } >#多个路径,生成多个 bundle >spec.resourcebundles = { 'MapBox' => ['MapView/Map/Resources/*.png'], 'OtherResources' => ['MapView/Map/OtherResources/*.png'] }
对比
其实上面官网上的描述我故意漏附了后面的几段话,文档上在两种方式下都强烈(strongly)推荐使用 resource_bundle 的方式。
>resource 下的描述 >We strongly recommend library developers to adopt resource bundles as there can be name collisions using the resources attribute. Moreover, resources specified with this attribute are copied directly to the client target and therefore they are not optimised by Xcode.
>resource_bundle 下的描述 >We strongly recommend library developers to adopt resource bundles as there can be name collisions using the resources attribute. >The names of the bundles should at least include the name of the Pod to minimise the chance of name collisions.
综合上述所说,就是使用 resource_bundle 主要有以下两点好处:
- 避免命名冲突(
bundle命名时最好包含 Pod 的名字来尽可能避免掉命名冲突) - Xcode 会对资源做优化,比如
.xcassets里的图片压缩、Slicing、以及 @2x/@3x 图片资源分离
我们来对比下两种方式下最终打包出来的应用目录结构:
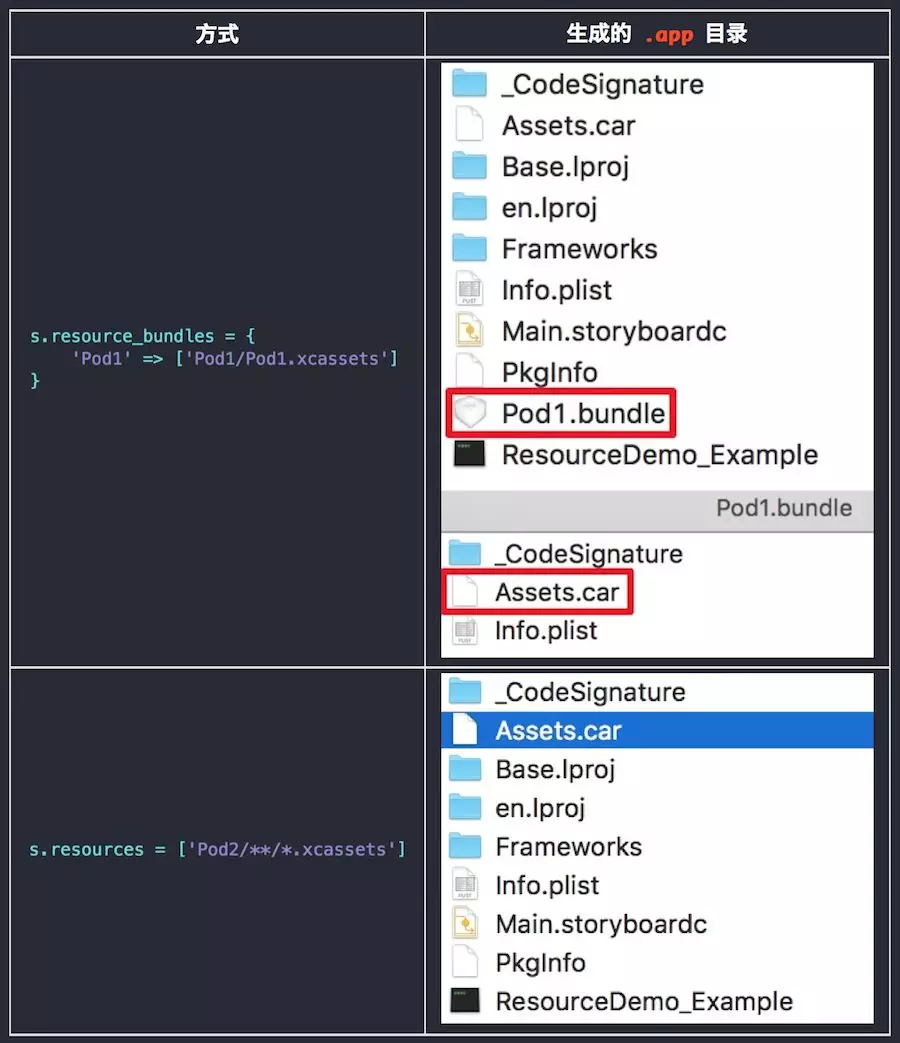
可以看出 resource_bundle 的形式会生成对应的 bundle(上图中的 Pod1.bundle),并且 .xcassets 最终会被打包到对应 bundle 下的 Assets.car 文件下(该文件可用这个工具打开:iOS-Images-Extractor)。 而 resource 的形式,会把 .xcassets 打包到应用根目录下的 Assets.car 中。
而要读取对应的图片时,resource 对应的代码长下面这样:
UIImage *image = [UIImage imageNamed:@"your-image-name"
                            inBundle:[NSBundle bundleForClass:[self class]]
       compatibleWithTraitCollection:nil];
而 resource_bundle 对应的读取代码如下面所示:
NSBundle *bundle = [NSBundle bundleForClass:[self class]];
NSURL *url = [bundle URLForResource:@"your-bundle-name" withExtension:@"bundle"];
NSBundle *targetBundle = [NSBundle bundleWithURL:url];
UIImage *image = [UIImage imageNamed:@"your-image-name"
                            inBundle:targetBundle
       compatibleWithTraitCollection:nil];
通过以上两个代码片段,相信各位已经知道代码片段1、2都可能存在图片命名冲突的问题,但是一般情况下片段2的冲突概率远小于片段1的。因为一般情况下,模块内的图片命名肯定是不会冲突的,而模块间的图片的命名就不好说了。当然如果团队里有明确的命名规范,片段1和片段2都不会有问题。 虽然片段2代码较片段1稍复杂一些,但是如果我们将其封装成一个 NSBundle 的分类,就免去了冗长的写法,对于 Storyboard/Xib 同样适用。
// 具体代码可以在 Demo 中找到
//.h
@interface NSBundle (Pod1Bundle)

+ (NSBundle *)pod1_bundle;

@end

//.m
// FakeClass 仅作占位符用,即只为分类中的 `bundleForClass:` 方法服务
@interface Pod1FakeClass : NSObject
@end
@implementation Pod1FakeClass
@end

@implementation NSBundle (Pod1Bundle)

+ (NSBundle *)pod1_bundle {
    NSBundle *bundle = [self bundleForClass:[Pod1FakeClass class]];
    NSURL *url = [bundle URLForResource:@"Pod1" withExtension:@"bundle"];
    return [self bundleWithURL:url];
}

@end

// 片段2可以简写为:
UIImage *image = [UIImage imageNamed:@"your-image-name"
                            inBundle:[NSBundle pod1_bundle]
       compatibleWithTraitCollection:nil];
Demo
第一个 commit 写好了两个 podspec,一个用 resource_bundle(Pod1),一个用 resource(Pod2),然后都引用 .xassets 资源,里面都有一个名为Pod的图片,主工程也有。区别在于 Pod 中的图片顶部会有该 Pod 名称的水印。然后页面上有3个 ImageView,目前只设置了中间那个 ImageView 的图片为主工程的图片。运行起来,一切表现正常,展示出来的图片也确实是主工程的图片。
第二个 commit 在主工程内分别读取 Pod1 和 Pod2 的名为 Pod 的图片,然后分别塞到上下两个 ImageView 中,运行起来,最下面那个 ImageView 的图片变成主工程的图片了,而最上面的 ImageView 的图片是正常的!!!这就是我们上面说到的那个问题,由于 Pod2 使用 resource 的方式,.xcassets 中图片是直接和主工程的 .xcassets 中图片一样是打包到 .app 根目录下的 Assets.car 中,命名一致,导致被主工程的图片给覆盖掉了(可以使用上面说到的解压工具解压,查看根目录 .car 下的文件内容,只有主工程的图片)。
第三个 commit 及 ruby-shell 分支主要解决应用 icon 为空的问题。当我们 Home 键回到桌面时,回发现 Demo 的 icon 是空的,但是我们是有设置 icon 的。所以我们有两种解决方案来解决这个问题。
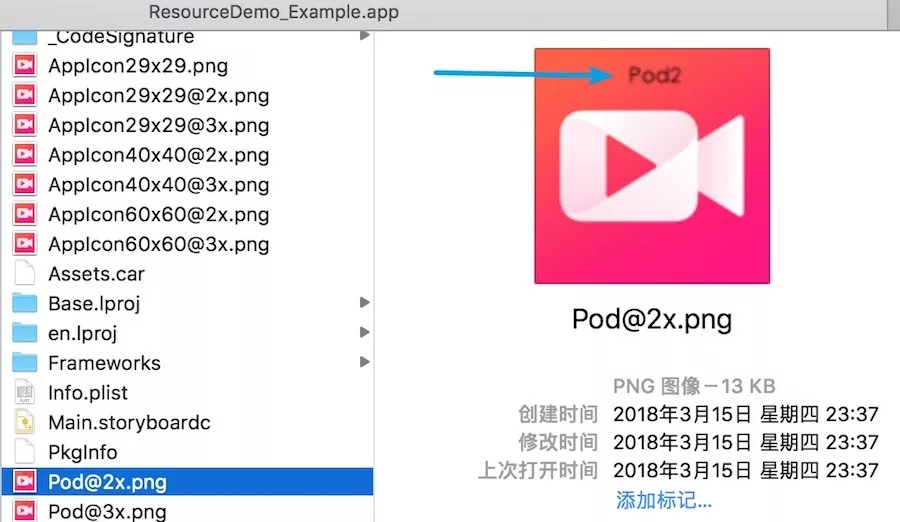
方案一:不使用 .xcassets
把图片放到 Pod2 目录下,不再放到 .xcassets 里面,然后 podspec 里的写法改成:
s.resources = ['Pod2/**/*.png']
pod install 之后再跑一下,发现 icon 回来了,但是图片还是被主工程覆盖了,查看 .app 文件,我们发现根目录下多了两张图片,他们来自于 Pod2 目录下。
相应的我们的读取代码就需要改成下面这种形式,还需要区分 @2x 和 @3x,非常麻烦,但是这个时候确实能读到对应的图片
// @2x 读取
_podImage = [UIImage imageNamed:@"Pod@2x"
                       inBundle:[NSBundle bundleForClass:[self class]]
  compatibleWithTraitCollection:nil];
// @3x
_podImage = [UIImage imageNamed:@"Pod@3x"
                       inBundle:[NSBundle bundleForClass:[self class]]
  compatibleWithTraitCollection:nil];
方案二:脚本
在 podfile 中加入下面这一段脚本
post_install do |installer|
copy_pods_resources_path = "Pods/Target Support Files/Pods-ResourceDemo_Example/Pods-ResourceDemo_Example-resources.sh"
string_to_replace = '--compile "${BUILT_PRODUCTS_DIR}/${UNLOCALIZED_RESOURCES_FOLDER_PATH}"'
assets_compile_with_app_icon_arguments = '--compile "${BUILT_PRODUCTS_DIR}/${UNLOCALIZED_RESOURCES_FOLDER_PATH}" --app-icon "${ASSETCATALOG_COMPILER_APPICON_NAME}" --output-partial-info-plist "${BUILD_DIR}/assetcatalog_generated_info.plist"'
text = File.read(copy_pods_resources_path)
new_contents = text.gsub(string_to_replace, assets_compile_with_app_icon_arguments)
File.open(copy_pods_resources_path, "w") {|file| file.puts new_contents }
end
然后 pod install 之后,运行即可。
以上两种方式执行之前最好
clean一下,防止Xcode缓存,导致以上方法执行后也会出现icon消失的情况。
总结
综合以上,我们再总结一下 resource_bundle 的优势:
- 绝大多数(99.999%)情况下不会有资源命名冲突问题
- 如果图片资源放到
.xcasset里面Xcode会帮我们自动优化、可以使用 Slicing 等(这里不仅仅指的是resource_bundle下的xcassets,只不过s.resource中如果引用会导致icon消失的问题)。
至于劣势,我觉得根本就没有,上面那个硬编码问题,完全可以通过我说的分类或者你自定义宏的方式把这个硬编码问题 Cover 掉。
如果认为文章中的观点或结论有问题,欢迎指出,一起沟通探讨。
参考链接 --- > App Icons not included in build from Xcode 9 > 关于 Pod 库的资源引用 resource_bundles or resources