


如何创建一个翻书动画(Part 1)[译]
在这个分两部分的教程系列中,你将开发一个漂亮的 iOS 打开及翻书动画,类似于Paper by FiftyThree:
2019.11.21 update 本文中图片和资源相关链接可能已失效,如需查阅,请查看原文
- 第一部分,你将学习如何自定义 UICollectionViewLayout,然后使用景深和阴影来让 app 看起来更加真实。
- 第二部分(译文),你将学习创建自定义的转场动画,然后集成手势来创建自然、简洁的 view 之间的转场。
原文:How to Create an iOS Book Open Animation: Part 1
本教程主要针对于进阶中的开发者,讲解一些自定义转场以及自定义 collectionView Layout 相关的知识。 如果你之前没有用过 collectionView,那么建议你先看看其他关于 collectionView 的教程。
感谢Attila Hegedüs创建了这个棒棒哒示例工程。
开始
下载模板,解压,在 Xcode 中打开。使用模拟器运行程序,将得到如下画面:
这个应用已经初具其功能,你可以滑动书库然后选中你喜欢的书来翻阅。上一次你一页一页翻看书籍是什么时候?在现有对 collectionView 了解的基础上,你可以美化页面视图。
工程结构
下面是快速对初始工程重要方面的一个简要描述: Data Model 文件夹包含三个文件:
- Books.plist:包含样书数据。每本书都含有一个图片封面以及一系列的书页图片
- BookStore.swift:单例,主要工作就是从 Books.plist 中加载数据然后创建 Book 对象。
- Book.swift:存储书本相关信息的类
Books 文件夹包含两个文件: - BooksViewController.swift:UICollectionViewController的子类,主要负责展示书单 - BookCoverCell.swift:展示所有书的封面,在BooksViewController使用。
Book 文件夹包含下面几个文件:
- BookViewController.swift:也是UICollectionViewController的子类,用来展示BooksViewController中选中的某一本书的内容页面
- BookPageCell.swift:用来展示书的所有页面,在BookViewController中使用。
最后一个文件夹 Helper 中包含:
- UIImage+Helpers.swift:是 UIImage 的一个扩展。里面有两个工具方法,一个用来圆角化图片,另一个用来缩放图片到指定大小。
以上就是整个工程的目录结构。现在让我们开始撸代码吧!
自定义 Book 布局
首先你需要为BooksViewController的 collectionView复写默认的布局,默认布局显示3个大的书本封面,它们几乎占据整个屏幕。你需要缩小它们来让它看起来更舒服,像这样:
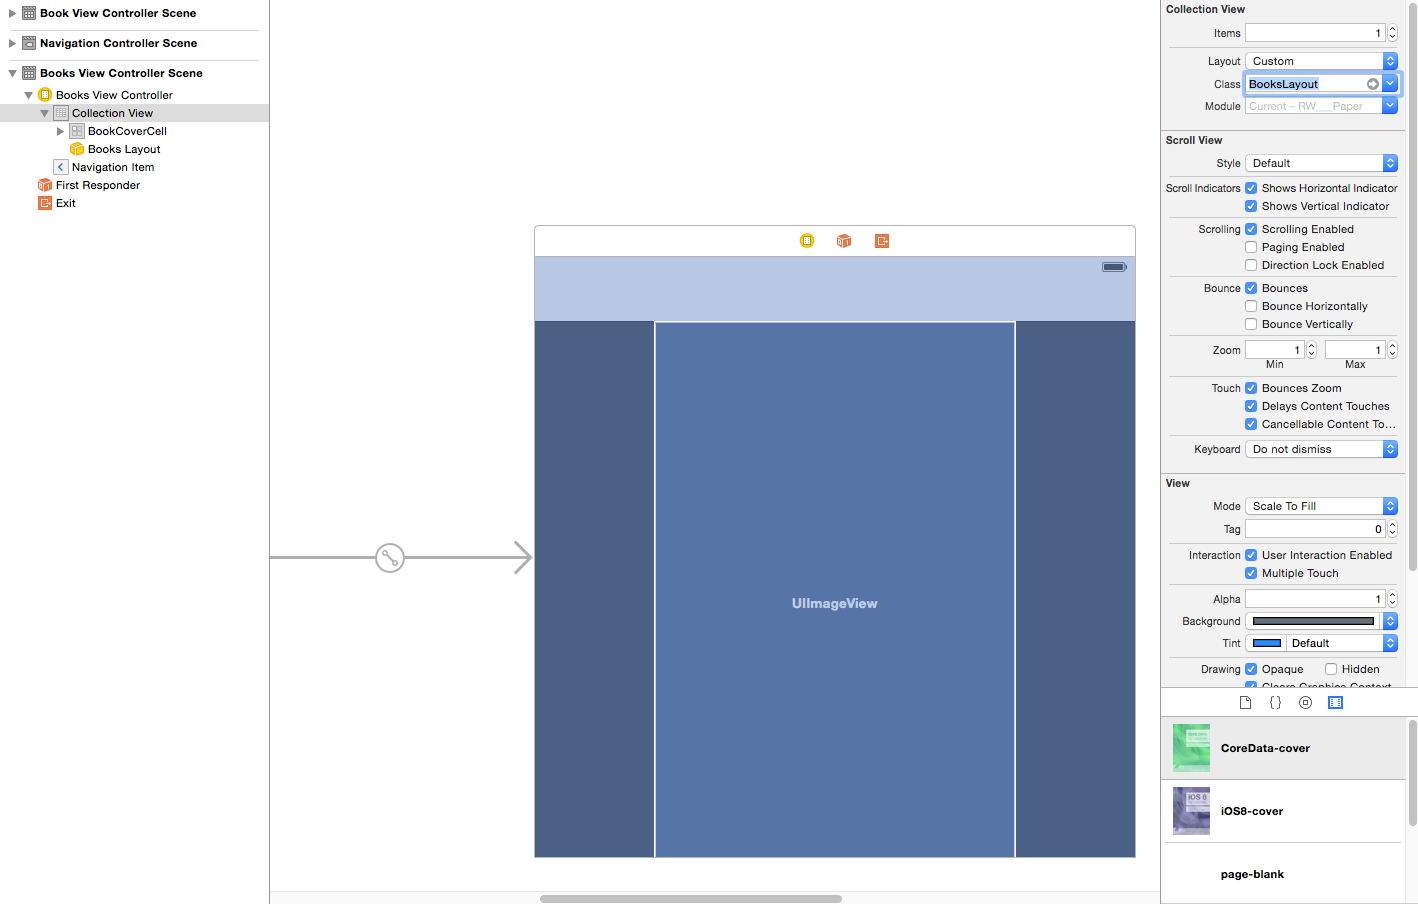
在你滑动的过程中,最接近屏幕中心的封面将会变大一些来表示它当前被选中。继续滑动,封面将会变小,这意味着你将它移到一边即远离屏幕中心。 在 AppBooks 下创建一个名为 Layout 的分组,然后右击 Layout 文件夹选择新建文件,然后创建一个继承自UICollectionViewFlowLayout的子类,取名为BooksLayout,语言为 Swift。 接下来你需要告诉BooksViewController的 collectionView 使用你新建的 Layout。 打开Main.storyboard,选中BooksViewController的Collection View然后在右侧的Attributes Inspector将 layout 设置为 Custom,Class 设置为 BooksLayout,如下图所示:
打开BooksLayout.swift,在BooksLayout类声明上面添加如下代码:
private let PageWidth: CGFloat = 362
private let PageHeight: CGFloat = 568
这两个常量将被用来设置 cell 的 size。 接着添加下面初始化方法:
required init(coder aDecoder: NSCoder) {
  super.init(coder: aDecoder)

  scrollDirection = UICollectionViewScrollDirection.Horizontal //1
  itemSize = CGSizeMake(PageWidth, PageHeight) //2
  minimumInteritemSpacing = 10 //3
}
下面是关于1,2,3的解释:
- 1.设置滑动方向为水平
- 2.设置 cell 的页面宽度为362,高度为568
- 3.设置 cell 减最小间距为10
接下来,在init(coder:)后面添加如下代码:
override func prepareLayout() {
  super.prepareLayout()

  //The rate at which we scroll the collection view.
  //1
  collectionView?.decelerationRate = UIScrollViewDecelerationRateFast

  //2
  collectionView?.contentInset = UIEdgeInsets(
    top: 0,
    left: collectionView!.bounds.width / 2 - PageWidth / 2,
    bottom: 0,
    right: collectionView!.bounds.width / 2 - PageWidth / 2
  )
}
prepareLayout()让你有机会在获取布局信息前进行一系列运算。下面是对每个数字注释的解释:
- 1.设置用户手指移开后collectionView 的减速速率。通过设置其值为UIScrollViewDecelerationRateFast,colletionView 将会更快速的停止滑动。也可以尝试以下Normal来查看以下对比。
- 2.设置 contentInset,让第一本书的封面一直居中。
现在你需要位没一个 cell 处理布局信息。 在prepareLayout()方法下面添加如下代码:
override func layoutAttributesForElementsInRect(rect: CGRect) -> [AnyObject]? {
  //1
  var array = super.layoutAttributesForElementsInRect(rect) as! [UICollectionViewLayoutAttributes]

  //2
  for attributes in array {
    //3
    var frame = attributes.frame
    //4
    var distance = abs(collectionView!.contentOffset.x + collectionView!.contentInset.left - frame.origin.x)
    //5
    var scale = 0.7 * min(max(1 - distance / (collectionView!.bounds.width), 0.75), 1)
    //6
    attributes.transform = CGAffineTransformMakeScale(scale, scale)
  }

  return array
}
layoutAttributesForElementsInRect(_:)返回一个包含了多个UICollectionViewLayoutAttributes对象的数组,这些对象为每个 cell 提供布局属性。下面是对代码的拆分:
- 1.调用父类的layoutAttributesForElementsInRect方法来获取每个 cell 默认的布局属性
- 2.遍历数组中的每个属性
- 3.获取当前 cell 布局属性的 frame
- 4.计算封面与屏幕中心的距离
- 5.根据4中的距离来改变封面的 scale,使其在0.75到1之间,最后在乘以一个系数0.7让它看起来更舒服
- 6.最后让封面使用设置后的 scale
紧接着在 layoutAttributesForElementsInRect(_:)之后添加如下代码:
override func shouldInvalidateLayoutForBoundsChange(newBounds: CGRect) -> Bool {
  return true
}
返回 true 表示在每一次 collectionView bounds 发生改变时强制让 layout 去重新计它的布局属性。collectionView 在滑动过程中 bounds 会发生改变,这使得重计算 cell 的布局属性变得很方便。
运行程序,将会发现中间的封面会比其他的大。
滑动来查看每个封面是如何放大和缩小的。但是如果书籍吸附在相应位置是不是更好呢?接下来我们就来实现这个。
书本吸附
targetContentOffsetForProposedContentOffset(_:withScrollingVelocity:)决定collectionView停在什么位置,然后返回一个offset来设置 collectionView 的 contentOffset。如果不复写这个方法,则返回默认的 offset。在shouldInvalidateLayoutForBoundsChange(_:)后面添加如下代码:
override func targetContentOffsetForProposedContentOffset(proposedContentOffset: CGPoint, withScrollingVelocity velocity: CGPoint) -> CGPoint {
  // Snap cells to centre
  //1
  var newOffset = CGPoint()
  //2
  var layout = collectionView!.collectionViewLayout as! UICollectionViewFlowLayout
  //3
  var width = layout.itemSize.width + layout.minimumLineSpacing
  //4
  var offset = proposedContentOffset.x + collectionView!.contentInset.left

  //5
  if velocity.x > 0 {
    //ceil returns next biggest number
    offset = width * ceil(offset / width)
  } else if velocity.x == 0 { //6
    //rounds the argument
    offset = width * round(offset / width)
  } else if velocity.x < 0 { //7
    //removes decimal part of argument
    offset = width * floor(offset / width)
  }
  //8
  newOffset.x = offset - collectionView!.contentInset.left
  newOffset.y = proposedContentOffset.y //y will always be the same...
  return newOffset
}
在用户手指离开屏幕时,该方法将会计算书本封面的 offset。
- 1.创建一个名为 newOffset 的 CGPoint
- 2.获取当前 collectionView 的 layout
- 3.获取 cell 的宽度
- 4.计算当前offset
- 5.如果 velocity.x > 0,用户是在向右滑。把 offset/width 理解成书本的 index,滑至对应的 index
- 6.如果 velocity.x = 0,用户滑动距离不够,保持上衣吃选中的书不变
- 7.如果 velocity.x < 0,用户向左滑
- 8.更新 x 的 offset,然后返回。保证书的封面居中显示
运行程序,滑动一下,你会发现滑动过程中书本,吸附效果更明显了。 你需要建立一种机制来使得用户只能点击居中的书本,然而现在不管书本在哪,你都可以点击。 打开BooksViewController.swift,将下面代码加到// MARK: Helpers注释下方:
func selectedCell() -> BookCoverCell? {
  if let indexPath = collectionView?.indexPathForItemAtPoint(CGPointMake(collectionView!.contentOffset.x + collectionView!.bounds.width / 2, collectionView!.bounds.height / 2)) {
    if let cell = collectionView?.cellForItemAtIndexPath(indexPath) as? BookCoverCell {
      return cell
    }
  }
  return nil
}
该方法返回居中的 cell。 接下来用下面代码来替换openBook(_:)
func openBook() {
  let vc = storyboard?.instantiateViewControllerWithIdentifier("BookViewController") as! BookViewController
  vc.book = selectedCell()?.book
  // UICollectionView loads it's cells on a background thread, so make sure it's loaded before passing it to the animation handler
  dispatch_async(dispatch_get_main_queue(), { () -> Void in
    self.navigationController?.pushViewController(vc, animated: true)
    return
  })
}
该方法简单使用了上面写的selectedCell方法来获取当前选中的书本。 然后用下面代码替换collectionView(_:didSelectItemAtIndexPath:):
override func collectionView(collectionView: UICollectionView, didSelectItemAtIndexPath indexPath: NSIndexPath) {
  openBook()
}
这个方法使得你的点击打开的书本一直是居中的 cell 对应的书本,而不是之前 indexPath 对应的书本。
至此,我们已经完成了 BooksLayout。是时候展示真正的技术了--让屏幕上的书本看起来更自然真实,同时支持翻页。
翻页布局
下图是我们要达成的最终效果:
使其看起来更像一本书!:]
在 Book 分组下新建 Layout 分组,右键新建一个继承自UICollectionViewFlowLayout名为BookLayout的子类,语言设置为 Swift。
和之前一样,bookCollectionView 需要设置其 Layout 为刚才新建的 Layout 类,如下图所示:

打开 BookLayout.swift,在 BookLayout 类声明上面加入如下代码:
private let PageWidth: CGFloat = 362
private let PageHeight: CGFloat = 568
private var numberOfItems = 0
我们将使用这些常量来设置每个 cell 的大小,同样我们需要记录一本书的页数。 接下来在类声明中添加如下代码:
override func prepareLayout() {
  super.prepareLayout()
  collectionView?.decelerationRate = UIScrollViewDecelerationRateFast
  numberOfItems = collectionView!.numberOfItemsInSection(0)
  collectionView?.pagingEnabled = true
}
和你在BooksLayout中所做的类似,不同的是:
- 1.设置减速速率为UIScrollViewDecelerationRateFast来增加减速速率,进而使得 scrollView 快速停止
- 2.获取当前书本的页数
- 3.启用翻页;让每次滑动都是一个页面的距离
继续在BookLayout.swift添加如下代码:
override func shouldInvalidateLayoutForBoundsChange(newBounds: CGRect) -> Bool {
  return true
}
和上面一样,在 bounds 发生改变时使布局失效,进而调用 prepareLayout 来计算新的布局。 接下来复写collectionViewContentSize()来设置 collecyionView 的 contentSize:
override func collectionViewContentSize() -> CGSize {
  return CGSizeMake((CGFloat(numberOfItems / 2)) * collectionView!.bounds.width, collectionView!.bounds.height)
}
该方法返回整个内容视图大小,高度不变,宽度随着 item 及书的页数发生改变。之所以要除以2,是因为每一页有两面,每一面上都有内容。 和你在BooksLayout中做的一样,需要复写layoutAttributesForElementsInRect(_:)方法,在这个方法中可以添加为每一页添加翻页效果。 在collectionViewContentSize()方法后面添加下面代码:
override func layoutAttributesForElementsInRect(rect: CGRect) -> [AnyObject]? {
  //1
  var array: [UICollectionViewLayoutAttributes] = []

  //2
  for i in 0 ... max(0, numberOfItems - 1) {
    //3
    var indexPath = NSIndexPath(forItem: i, inSection: 0)
    //4
    var attributes = layoutAttributesForItemAtIndexPath(indexPath)
    if attributes != nil {
      //5
      array += [attributes]
    }
  }
  //6
  return array
}
和 BooksLayout 不同的是,因为所有 cell 都在可见区域中,所以我们在 layoutAttributesForItemAtIndexPath(_:) 方法中来计算布局属性。 下面是每一行的解释:
- 1.创建一个新的数组来持有所有 cell 的布局属性
- 2.遍历所有 item
- 3.为每个 item 创建一个 indexPath
- 4.获取 indexPath 对应的布局属性。你马上就要复写 layoutAttributesForItemAtIndexPath(_:) 方法
- 5.将布局属性添加到数组当中
- 6.返回所有 cell 的布局属性
页面的几何运算
在你实现 layoutAttributesForItemAtIndexPath(_:) 之前,花点时间来考虑布局,想想它该如何工作,我们是否能写一些工具方法来使得所有事情简单化、模块化。:]
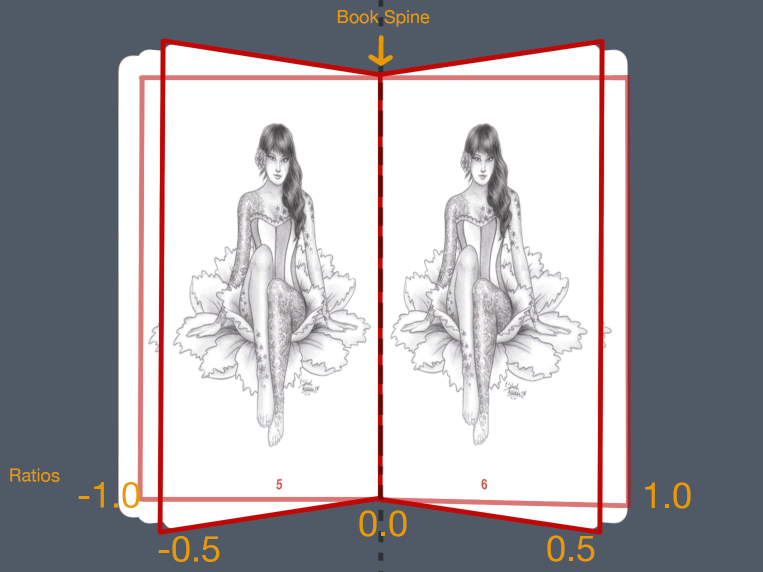
上图显示书页的翻动是以书脊作为旋转轴。上图中的比例从-1.0到1.0变化。为什么?想象一下将一本书放在桌子上,书脊表示0.0,当你从左至右翻页时,翻转比率从-1.0(最左端)变到1.0(最右端)。 因此,你可以用如下比率来表示你的翻页过程:
- 0.5表示页面成90度状态,与桌面垂直
- +/- 0.5表示与桌面成45度
- +/- 1.0表示与桌面平行
因为旋转是逆时针的,角度符号与比率符号相反。(即正负符号相反) 首先将下面工具方法添加在 layoutAttributesForElementsInRect(_:) 之后:
//MARK: - Attribute Logic Helpers

func getFrame(collectionView: UICollectionView) -> CGRect {
  var frame = CGRect()

  frame.origin.x = (collectionView.bounds.width / 2) - (PageWidth / 2) + collectionView.contentOffset.x
  frame.origin.y = (collectionViewContentSize().height - PageHeight) / 2
  frame.size.width = PageWidth
  frame.size.height = PageHeight

  return frame
}
根据 collectionView 的中心为每一个页面计算其 frame。getFrame(_:) 方法会将每个页面边缘与书脊对其。改变的唯一变量是collectionView的内容在x方向偏移。 接下来,添加如下方法:
func getRatio(collectionView: UICollectionView, indexPath: NSIndexPath) -> CGFloat {
  //1
  let page = CGFloat(indexPath.item - indexPath.item % 2) * 0.5

  //2
  var ratio: CGFloat = -0.5 + page - (collectionView.contentOffset.x / collectionView.bounds.width)

  //3
  if ratio > 0.5 {
    ratio = 0.5 + 0.1 * (ratio - 0.5)

  } else if ratio < -0.5 {
    ratio = -0.5 + 0.1 * (ratio + 0.5)
  }

  return ratio
}
上面方法计算页面的比率。下面是对每个注释的解释:
- 1.计算页面在书本当中的编号,记住书页是双面的。乘以0.5可以得到你当前所在的页面。
- 2.根据你翻动的权重计算比率
- 3.需要将比率范围限制在-0.5到0.5之间。乘以0.1是用来给页面之间添加一个间距使得它们看起来是被遮盖一样。
在你计算好比率之后,就可以用它来计算当前翻动的角度了。在上面代码后添加如下代码:
func getAngle(indexPath: NSIndexPath, ratio: CGFloat) -> CGFloat {
  // Set rotation
  var angle: CGFloat = 0

  //1
  if indexPath.item % 2 == 0 {
    // The book's spine is on the left of the page
    angle = (1-ratio) * CGFloat(-M_PI_2)
  } else {
    //2
    // The book's spine is on the right of the page
    angle = (1 + ratio) * CGFloat(M_PI_2)
  }
  //3
  // Make sure the odd and even page don't have the exact same angle
  angle += CGFloat(indexPath.row % 2) / 1000
  //4
  return angle
}
这里进行了一些数学计算,但是拆开来看也不是很难:
- 1.判断当前页面是否为双书面,即序号是否为2的倍数,也就是说它处在书脊的右边。向左翻动是逆时针,在书脊右侧的页面的角度是负的。回想一下之前定义的在-0.5到0.5变化的比率。
- 2.如果当前面是奇数,那么它就在书脊的左侧,向右翻动是顺时针,所以书脊左侧的页面角度为正。
- 3.为每个页面添加一个偏移角度
- 4.返回旋转角
现在我们有了旋转角,我们需要转换每一个页面,添加如下代码:
func makePerspectiveTransform() -> CATransform3D {
  var transform = CATransform3DIdentity
  transform.m34 = 1.0 / -2000
  return transform
}
修改 transform 中的m34来为每个页面增加透视。 现在是时候加上旋转效果了。加入如下代码:
func getRotation(indexPath: NSIndexPath, ratio: CGFloat) -> CATransform3D {
  var transform = makePerspectiveTransform()
  var angle = getAngle(indexPath, ratio: ratio)
  transform = CATransform3DRotate(transform, angle, 0, 1, 0)
  return transform
}
该方法使用上面提到的两个工具方法来计算 transform 和 angle,然后创建了一个 CATransform3D并将其使用到页面的 y 轴上。 现在所有工具方法已准备就是,是时候为每个 cell撸一下布局属性了。在 layoutAttributesForElementsInRect(_:) 后面加入下面代码:
override func layoutAttributesForItemAtIndexPath(indexPath: NSIndexPath) -> UICollectionViewLayoutAttributes! {
  //1
  var layoutAttributes = UICollectionViewLayoutAttributes(forCellWithIndexPath: indexPath)

  //2
  var frame = getFrame(collectionView!)
  layoutAttributes.frame = frame

  //3
  var ratio = getRatio(collectionView!, indexPath: indexPath)

  //4
  if ratio > 0 && indexPath.item % 2 == 1
     || ratio < 0 && indexPath.item % 2 == 0 {
    // Make sure the cover is always visible
    if indexPath.row != 0 {
      return nil
    }
  }
  //5
  var rotation = getRotation(indexPath, ratio: min(max(ratio, -1), 1))
  layoutAttributes.transform3D = rotation

  //6
  if indexPath.row == 0 {
    layoutAttributes.zIndex = Int.max
  }

  return layoutAttributes
}
每个 cell 都会调用这个方法:
- 1.为给定的 indexPath 创建一个 UICollectionViewLayoutAttributes
- 2.使用 getFrame 方法给布局属性设置 frame,来保证它会与书脊对齐
- 3.用之前的 getRatio 方法来设置布局属性的比率
- 4.判断当前页的比率是否在限制范围内,如果不在就不展示这个 cell。为了优化,通常不显示背面,只展示正面。当然如果是书的封面则需要一直展示。
- 5.根据计算得到比率来获取 rotation 和 transform
- 6.判断 indexPath 是否为第一页,如果是第一页则设置其 zIndex 让它显示在所有页面之上,避免闪现情况发生。
运行程序,打开书本,翻动以下。。。what the f**k!!

页面的锚点貌似是 center 而不是边缘!
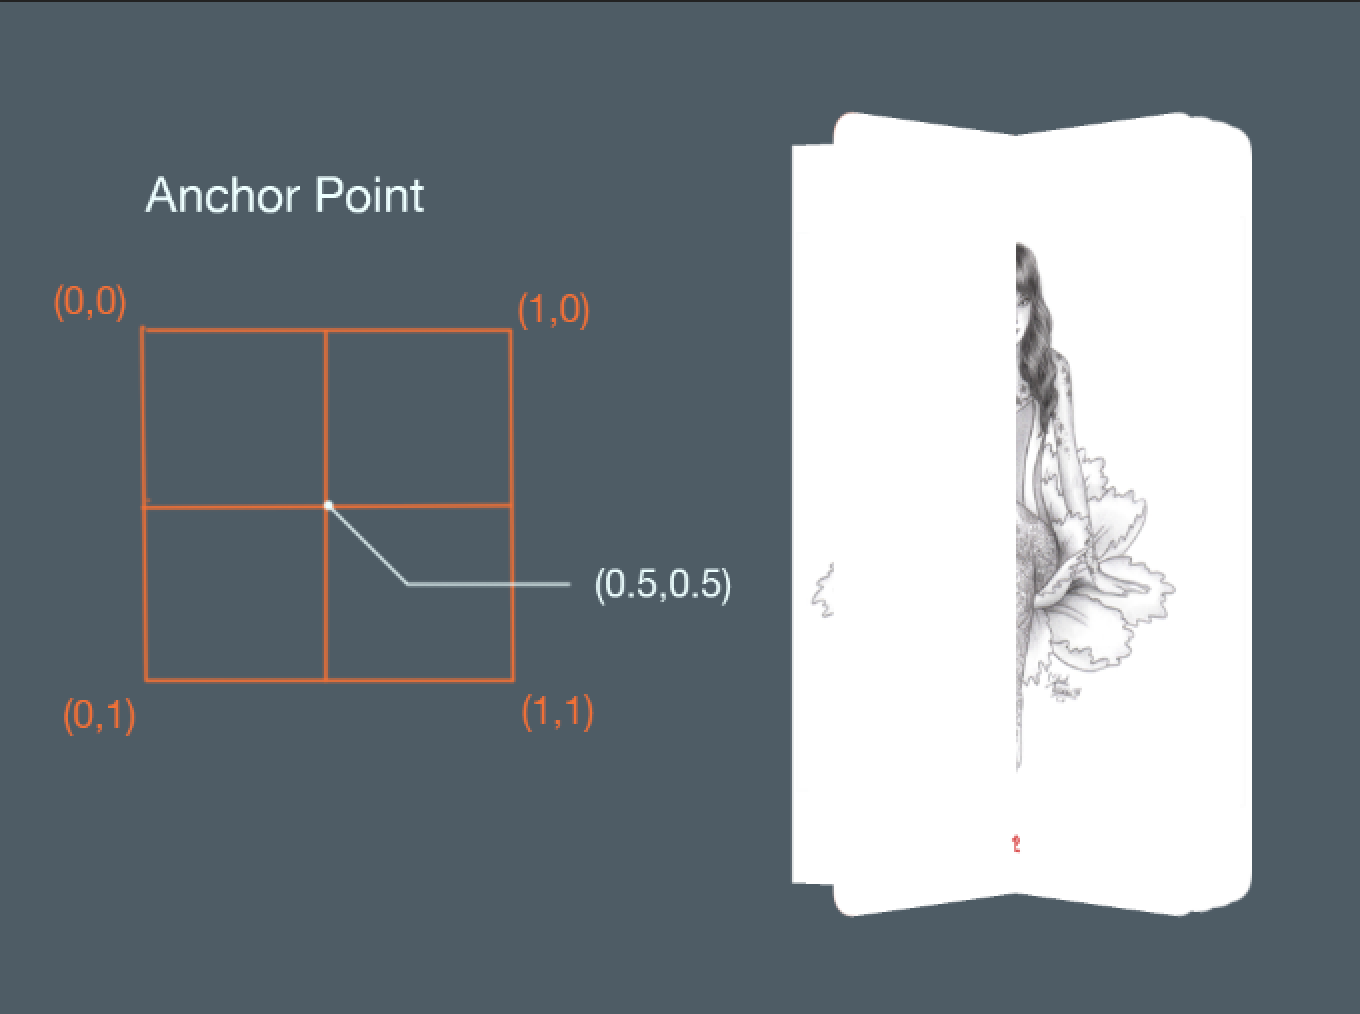
如图所示,每个页面锚点坐标为(0.5,0.5)。你知道怎么解决这个问题吗?
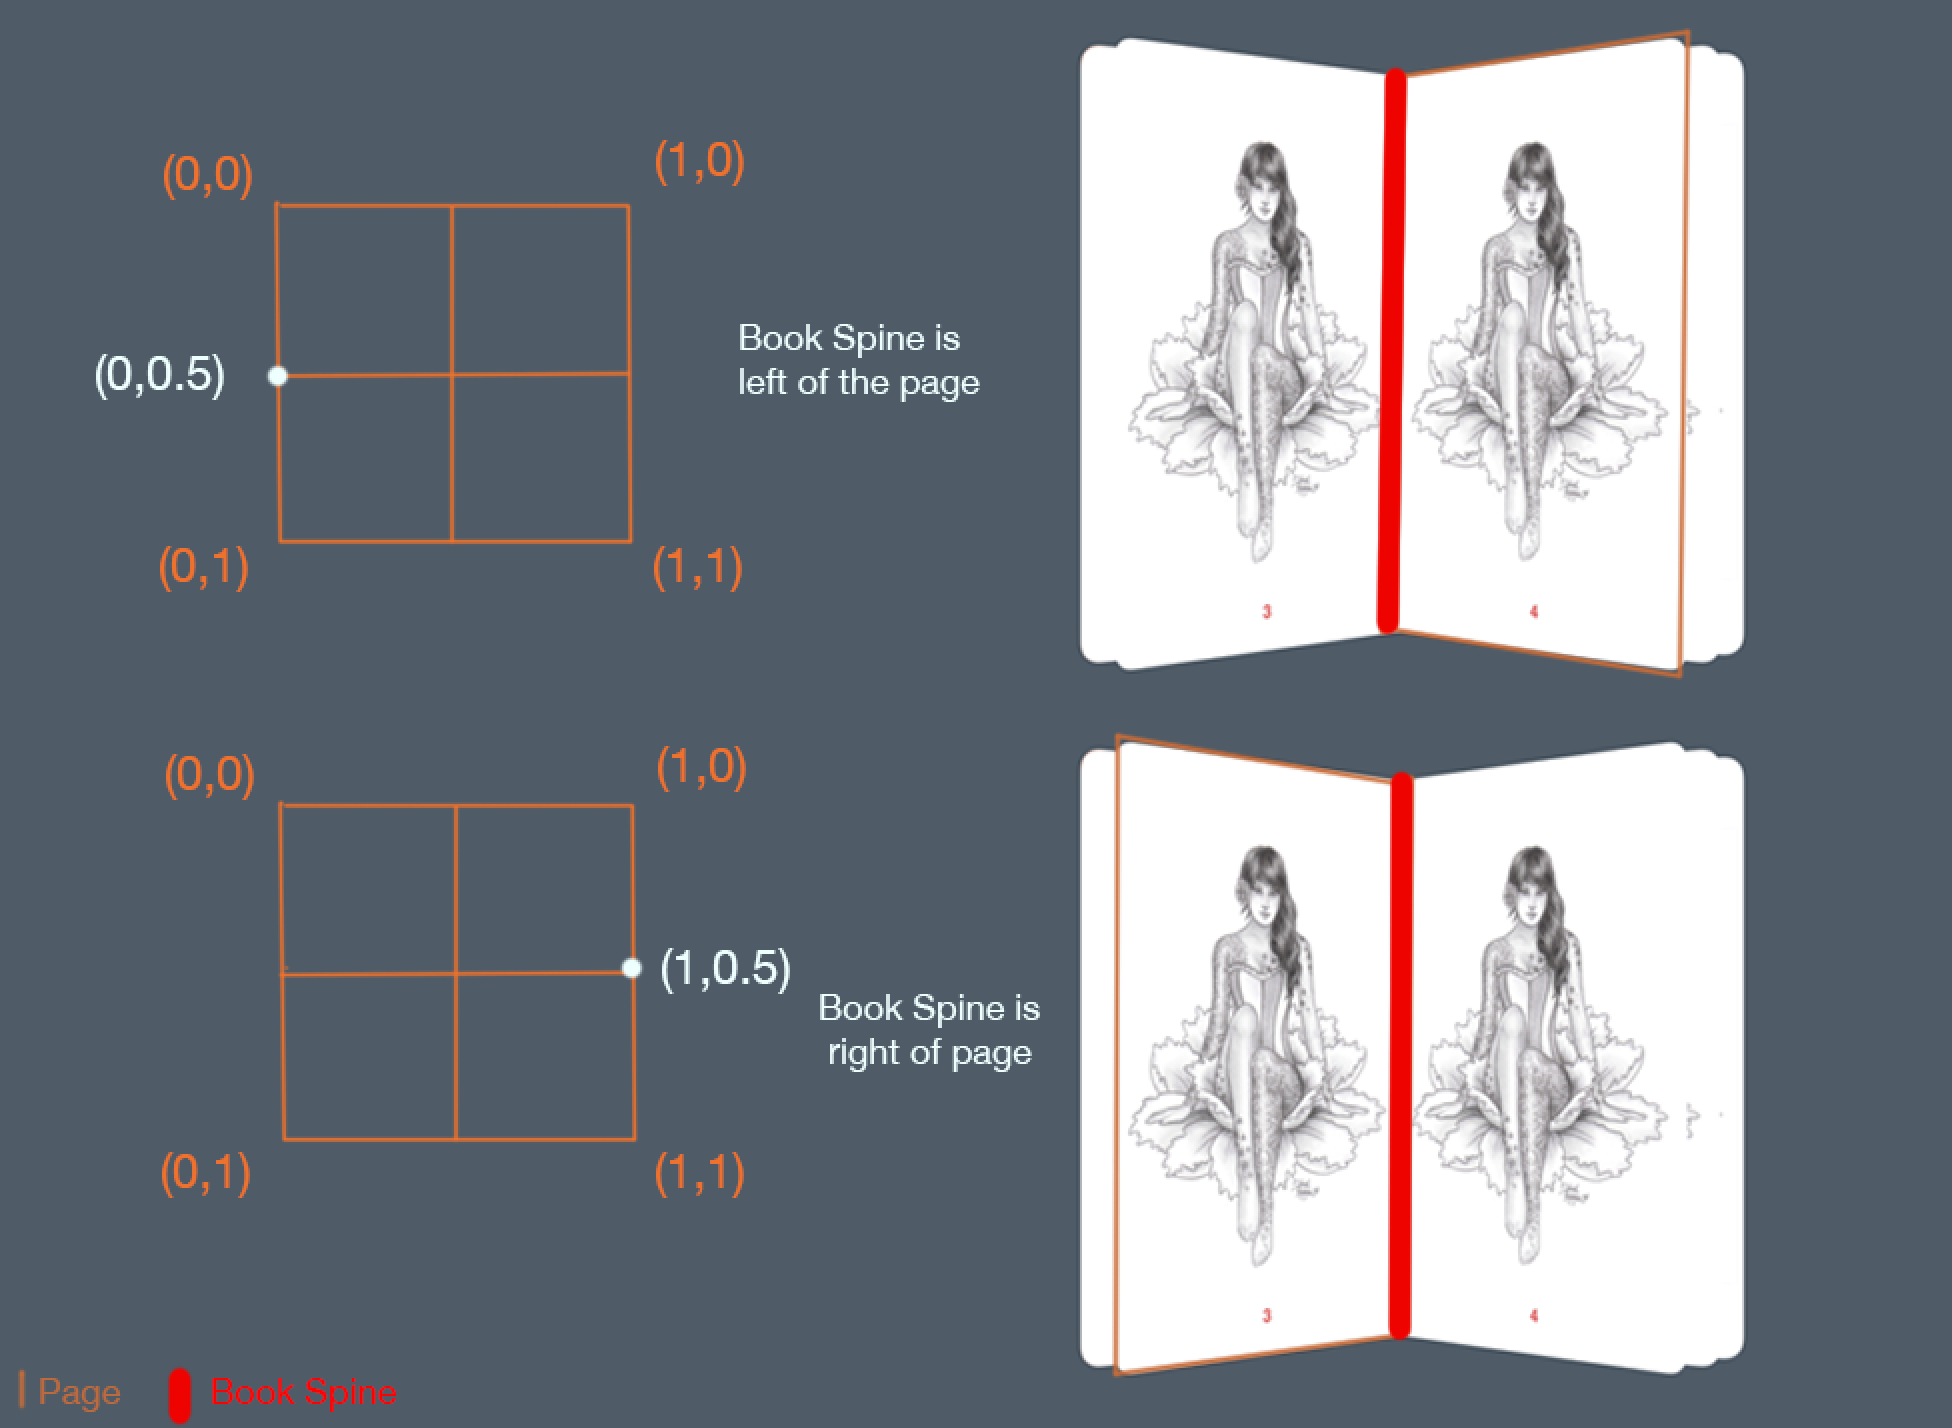
很明显,你需要改变锚点位置,使其位于边缘。如果页面在书脊的右侧,锚点应该为(0,0.5),反之锚点为(1,0.5)。
打开 BookPageCell.swift 添加如下代码:
override func applyLayoutAttributes(layoutAttributes: UICollectionViewLayoutAttributes!) {
  super.applyLayoutAttributes(layoutAttributes)
  //1
  if layoutAttributes.indexPath.item % 2 == 0 {
    //2
    layer.anchorPoint = CGPointMake(0, 0.5)
    isRightPage = true
    } else { //3
      //4
      layer.anchorPoint = CGPointMake(1, 0.5)
      isRightPage = false
    }
    //5
    self.updateShadowLayer()
}
上面复写了 applyLayoutAttributes(_:) 方法,它使用了 BookLayout 中的布局属性。这看起来非常言简意赅。
- 1.判读当前页面是否为双数,也就是当前页面在书脊右侧。
- 2.将锚点设置成左边缘,然后设置
isRightPage为 true。这个变量可以帮你确定圆角的位置。 - 3。如果当前页面为奇数,那么它就处于书脊左侧
- 4.设置奇数页面的锚点为其右测边缘,然后设置
isRightPage为 false - 5.最后更新当前页的阴影 layer
运行一下,翻动页面,看起来比之前好多了。
到此为止,该教程的第一部分已经结束。花点时间休息一下,想想这个过程是不是很屌?!
何去何从
你可以在此下载第一部分的完整代码。 你从默认的 layout 开始,然后学习了如何自定义一个新的 layout 然后创建了一个比较屌的效果!用这个 app 的人会觉得他们像在翻实体书一样。正是这样一个细节使得一个普通的阅读类软件变得深受用户欢迎。 然而,一切还没有结束。在第二部分中你可以让这个 app 变得更好更简洁。 你是否也有很炫的布局想法?如果你有任何疑问、评论以及对这篇教程的其他想法,欢迎在下面讨论。